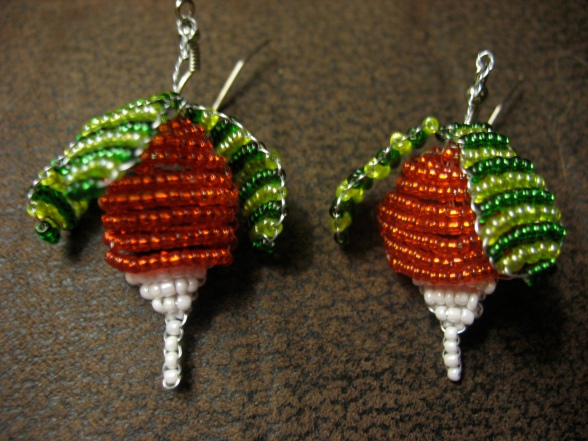
 While I was making my first radish I spontaneously thought, “What if there are other people who are as crazy as me?” This is the result of that thought.
Materials:
28 gauge beading wire
A fair few small reddish orangish beads
same size opaque white beads
same size light green beads
2 earring hooks
pliers and wire cutters
Radishes:
Cut off a fairly long piece of the wire, much more than you think you’ll need. It’s heartbreaking and physically painful to pull everything out when you didn’t cut enough wire. String one bead and move it to the middle of the length of wire. Add another bead and string the other end of the wire through the other side of the bead so that you have the wire coming out of both ends of the bead. Pull tightly. Do this as many times as you like. I have a chain of three beads on my pair, but Luna in the movies only has two. (illustration 1) If you are doing it movie accurate, continue on.
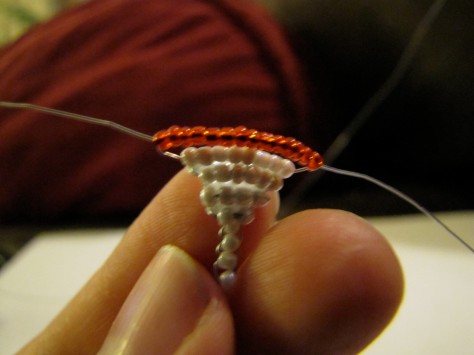
Next, add two beads and string them with both ends of the wire as you did before. Pull tightly again, and then add three beads, doing the same with them. Fold the three beads down until it is right next to two beads, not above it. (illustration 2) Add four beads and do the same as before, bending them down on top of the two bead layer. Continue adding beaded layers until you have reached eight beads. (illustration 3)Now sit back, take a breather, and admire your work because you are done with the white beads! Now we move on to the red beads.

So to do this, you are going to want to add around 16 beads. This will make it overlap a bit with the white, but I think that’s how it looks in the movie. (illustration 4) Continue adding about one or two beads per row until its the width you desire, then decrease dramatically. You should have about five to ten rows that are strictly decreasing, but don’t decrease all the way to one bead, or else it will end in a point. I had about three beads on my last row. There you go! You’re done with the red! (illustration 5)
Making the leaves is very simple. String three dark green beads on an average length of wire, making sure that they stay somewhere near the middle. String six light green beads and thread the opposite end of the wire the other end, just like you did with both the white and the red beads. String eight dark green beads just like the row before it, making sure that the beads are in a two dimensional row, unlike your three dimensional radish. String eight light green beads, then eight dark green, then eight light green, so that you have four rows or eight, plus the two smaller ones. Now start decreasing by two beads, using alternate shades of green per row. The width of the last row should be two beads. (illustration 6) Note: I accidentally messed up a bit on the decrease, so I think when it’s done properly, you will end with two light green instead of dark green.
Make two more, attach them to your radish, hook on the earring hook and voila! You’ve got your own dirigible plum! Now make one more and you’ve got the finishing touches for your Luna Lovegood costume!
The Leaky Cauldron puts it so well:
You can use them to make things for yourself. You can make some for your friends and ask them to pay for supplies. You CANNOT, however, ask them to pay you to do it as though you had created this pattern by yourself, or try to sell you crafts to a local store.
Think about it. Would you take a Prisoner of Azkaban book, photocopy it, put your name in big red letters on the front cover and try to sell it in your local library? The answer is, obviously, no. Well, selling crafts you have made but not designed would be just as bad!


