Dirigible Plum Earring Tutorial

While I was making my first radish I spontaneously thought, “What if there are other people who are as crazy as me?” This is the result of that thought.
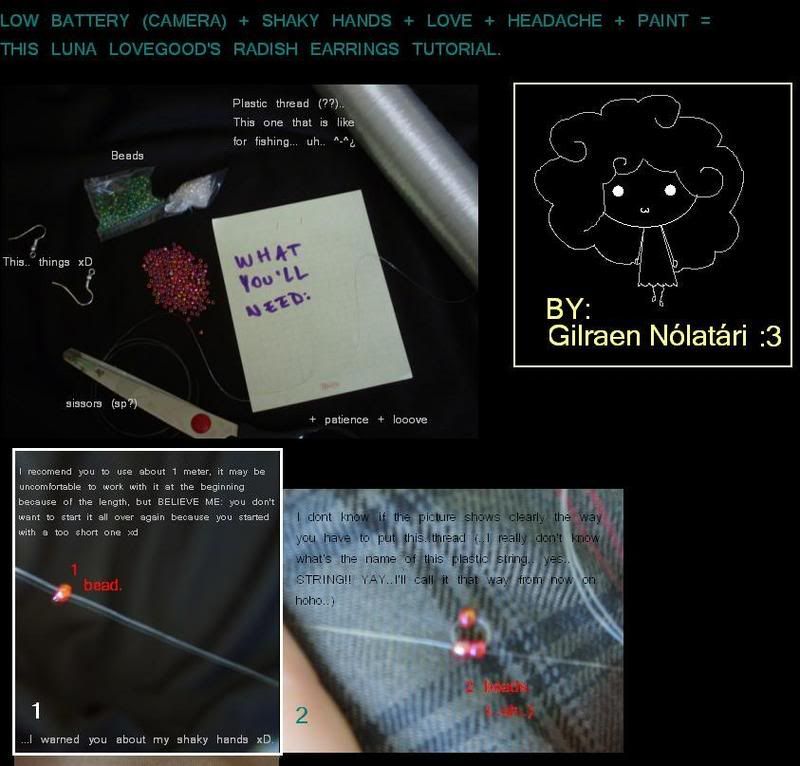
Materials:

28 gauge beading wire

A fair few small reddish orangish beads

same size opaque white beads

same size light green beads

same size dark green beads

2 earring hooks

pliers and wire cutters

Instructions:

Radishes:

Cut off a fairly long piece of the wire, much more than you think you’ll need. It’s heartbreaking and physically painful to pull everything out when you didn’t cut enough wire. String one bead and move it to the middle of the length of wire. Add another bead and string the other end of the wire through the other side of the bead so that you have the wire coming out of both ends of the bead. Pull tightly. Do this as many times as you like. I have a chain of three beads on my pair, but Luna in the movies only has two. (illustration 1) If you are doing it movie accurate, continue on.

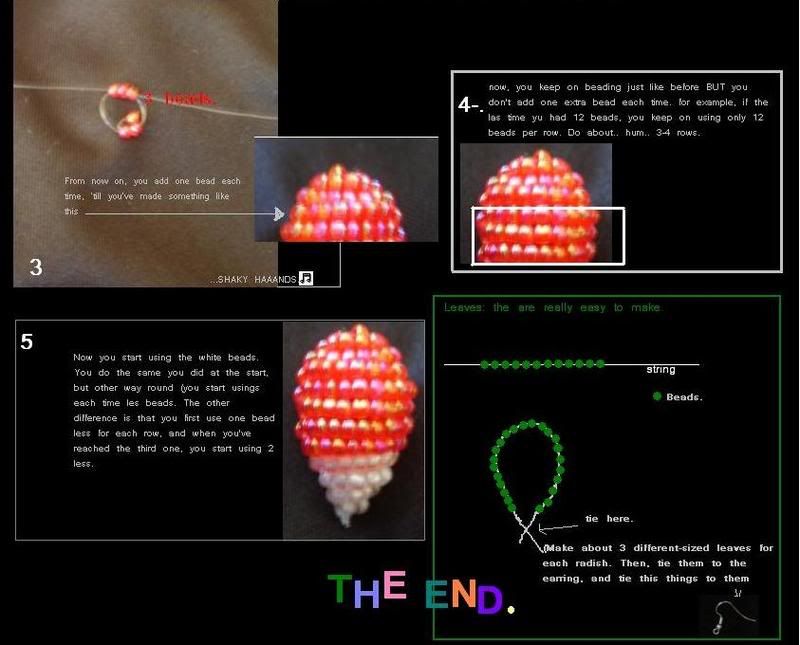
Next, add two beads and string them with both ends of the wire as you did before. Pull tightly again, and then add three beads, doing the same with them. Fold the three beads down until it is right next to two beads, not above it. (illustration 2) Add four beads and do the same as before, bending them down on top of the two  bead layer. Continue adding beaded layers until you have reached eight beads. (illustration 3)Now sit back, take a breather, and admire your work because you are done with the white beads! Now we move on to the red beads.

So to do this, you are going to want to add around 16 beads. This will make it overlap a bit with the white, but I think that’s how it looks in the movie. (illustration 4) Continue adding about one or two beads per row until its the width you desire, then decrease dramatically. You should have about five to ten rows that are strictly decreasing, but don’t decrease all the way to one bead, or else it will end in a point. I had about three beads on my last row. There you go! You’re done with the red! (illustration 5)

Making the leaves is very simple. String three dark green beads on an average length of wire, making sure that they stay somewhere near the middle. String six light green beads and thread the opposite end of the wire the other end, just like you did with both the white and the red beads. String eight dark green beads just like the row before it, making sure that the beads are in a two dimensional row, unlike your three dimensional radish. String eight light green beads, then eight dark green, then eight light green, so that you have four rows or eight, plus the two smaller ones. Now start decreasing by two beads, using alternate shades of green per row. The width of the last row should be two beads. (illustration 6) Note: I accidentally messed up a bit on the decrease, so I think when it’s done properly, you will end with two light green instead of dark green.

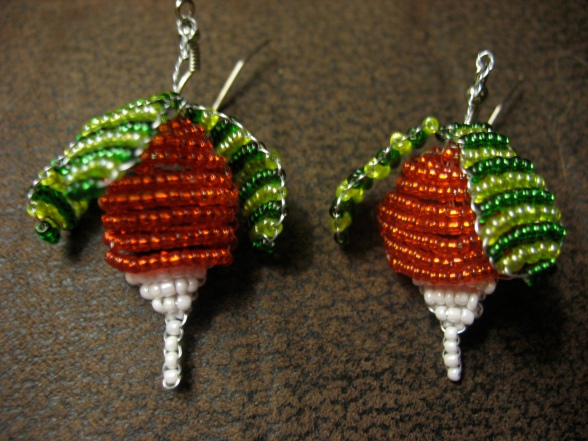
Make two more, attach them to your radish, hook on the earring hook and voila! You’ve got your own dirigible plum! Now make one more and you’ve got the finishing touches for your Luna Lovegood costume!

The Leaky Cauldron puts it so well:

You can use them to make things for yourself. You can make some for your friends and ask them to pay for supplies. You CANNOT, however, ask them to pay you to do it as though you had created this pattern by yourself, or try to sell you crafts to a local store.

Think about it. Would you take a Prisoner of Azkaban book, photocopy it, put your name in big red letters on the front cover and try to sell it in your local library? The answer is, obviously, no. Well, selling crafts you have made but not designed would be just as bad!

Dirigible Plums Pt. 2 (now with Beetle Ring)

Well, I’ve begun again. This time with smaller beads and wire instead of fishing string. I’m am most happy with the result. So happy, in fact, that I’m thinking about selling them. Perhaps. Still not too sure about that. Maybe I’ll just give some away…. Ahem, anyways. Here they are.

And not to be forgotten, the Beetle Ring! I used smaller beads than the ones they used, and you can’t really tell that the beads on the beetle back (try saying that five times fast) are iridescent. 😦 Oh well, I’m still quite happy with it.

Dirigible Plum Earrings

Yup, they’re finished. It took a lot of work and headache, but I completed them in a little over a day. The pattern I used was, I’m sorry to say, not very descriptive, so I had to improvise a bit. I think the most original and nerdy part of the process was using a soldering iron to melt the plastic wire a bit at the bottom of the plum so that it wouldn’t untie itself. They definitely aren’t perfect, but I like them.

Handmade Luna Lovegood Costume!

Who is going to the midnight showing of Harry Potter and the Deathly Hallows Pt. 2? Me! Who is going as Luna Lovegood? ME!!!! Yup yup, and I’m not buying a single machine made prop, which means I’m going to have to make them all! Which is really exciting, but kind of daunting.

So first and foremost, I’m going to need a scarf. This shouldn’t be too difficult because I already made a Gryffindor scarf. I even made my own pattern. So here‘s the link to that one. Even though it’s on this blog… Huh. I’m definitely going to alter it though, like making it flat and making the silver stripes shorter than the middle blue stripe. But anyways.

Secondly, I’m going to need some robes. Thank goodness for that sewing machine I got for Christmas! I found a pretty simple pattern that I think I can do once I figure out how to use my sewing machine… And if all else fails, I’ll hand sew it! You have to be a member to see the pattern, but it’s free, so if you really want to see it, don’t be afraid to sign up. I haven’t gotten any nasty viruses and my inbox is advertisement free. So here it is.

The patch on the robes is going to be a little tougher. As much as I like cross stitch, embroidery is much different, and I’ve never done it before. So if I don’t figure that out, time to pull up ebay! Here‘s my model if ever I get there. The TM after Ravenclaw just ruins it! That will definitely go if ever I embroider one.

Next in my Luna costume is the indispensable radish earrings! I found a couple of tutorials for that one, and I think I like this one the best. Well, that’s just the first part. Here‘s the second part. There’s also this one, but I like the other one the best…. Did I say that already? Just a note, I ended up making my own tutorial for the earrings that I’m in the process of writing. Hang in there, and I’ll have it eventually!

While I’m on the subject of jewelry, I can’t forget the butterbeer cork necklace! It looks super easy, so I don’t think I’ll need a tutorial for it. Just two strands of fishing wire, a plethora of light blue beads, a cork, some wire, et voila! The perfect necklace to keep the nargles away.

Next in line is the Spectrespecs! I could, of course buy them on Amazon or something, but what’s the fun in that? Not to mention they’re plastic. Luna gets them out of a magazine, so do you think they will be hard plastic? Nein, they’re cardboard or card stock. Which is exactly why I’m making my own using this awesome tutorial!

So then we have the Ravenclaw tie! They’re pretty expensive, so I thought I would just get one that looked kind of like one, but then I found a pretty awesome idea that’s much cheaper. Buy a dark blue tie, get silver fabric markers and draw the stripes on there! Brilliant! I think that’s one of the easiest parts of the costume.

Now to the more difficult part. The Hogwarts skirt. I found a pretty good pattern for it that I think I can do. Here‘s this one.

And then I’m not so sure if I’ll get to this one, but I want to knit a Hogwarts sweater or sweater vest. I already have a pattern from the nifty Harry Potter knitting pattern book called Charmed Knits. But if any of my readers don’t have that book, here’s a pattern for first a sweater (it’s ladies size ten, but the Leaky Cauldron has more sizes) and then the sweater vest, (also size ten, but with more sizes). Or, because I want to be truer to Luna in particular, here‘s a pattern that could be altered a bit to make a pretty good Hogwarts cardigan. I think I may do this one instead.

Now, the wand. I don’t think I’ll be able to make her wand because I. Can’t. Carve. At all. Period. Luna actually has two wands, a rather plain one that has little carved acorns and leaves on the handle. Her other wand is a little more ornate, with a handle carved in the shape of a daffodil. I really like the second one.

LATER ADDITIONS: Because you never actually see Luna wearing a Ravenclaw scarf, you crocheters can do this one instead. And if you don’t crochet, you probably have a friend who does (like in my case).

Also, don’t forget the beetle ring! Now I have no idea how one is supposed to bead one of these, but it probably is possible. I’m definitely going to try it.

And, if you REALLY want to have EVERYTHING, here’s a knifty knitting (sorry, couldn’t help it) pattern for the hat that she wears at the Hog’s Head in the fifth one.

And then there’s also the lacy sleeved cardigan that she wears in the fifth one, for you crocheters out there.

Well, that’s about it, really. Wow, I’m going to be workin’ for a loooong time. I’d better get started! Here’s a couple of picture of Luna for inspiration.